Senin, 14 Februari 2011

Rahasia : Troubleshooting ./configure, make and make install Tutorial

Sometimes, the typical sequence to compile a program doesn't work. It starts spitting out all kinds of errors and seems to do everything but compiling that annoying program already. What to do then? This tutorial describes how to get rid of many frequently occuring errors during a typical Linux compiling sequence.
Note: You should only compile software when you really need to do it. Compiling can be dangerous to your Linux installation. If you want to install some software, please look for a precompiled package (like a .rpm or a .deb) first. If you really need to compile, do it with care.
Note: This tutorial assumes that you have some linux command line knowledge and that you know how to work with your distro's package manager.
We can divide the errors in three categories:
  • ./configure errors
  • make errors
  • make install errors
It should be quite obvious how to recognize them: ./configure errors are outputted by the configure script, make errors by the make command and so on. I'll now list common errors, with solutions, in these three categories.

./configure errors

The following list contains some common errors that ./configure can give, sorted by frequency of appearance. The first one is the most occuring one. Things between ( and ) are optional, they do not always appear. A bold italic OR indicates that multiple errors have the same solution. Text between < and > describes the kind of string that should appear on that place.
  1. (configure:) (error:) ( (or higher)) not found. (Please check your installation!) OR checking for ... (configure:) (error:) not found. OR (configure:) (error:) ( (or newer)) is required to build
    • This usually means that the -dev or -devel version of the package with the name is not installed on your computer. Please use your distro's package manager (or any other method to find and install packages) to search for and install, if possible, the -dev or -devel version. If the -dev or -devel version is already installed, or if it doesn't exist, have a look at the version number currently installed. Is it high enough? If it is lower than (if applicable), try upgrading the package. If that is not an option for you, you can also try compiling an older version of the package you're trying to compile. Older releases generally use earlier version of the libraries / programs they depend upon.
      If the package that ./configure cannot find is a library (usually indicated by the package name being lib), and you're sure you've got the right version installed, try to find the location where the library's files are located. If this directory is not included in your ld conf file (which is usually located at /etc/ld.conf or /etc/ld.so.conf) you should add it, and run ldconfig (usually located at /sbin/ldconfig). Please note that ldconfig should usually be executed with root permissions. If you don't know how to do that, have a look at the first point of Make install errors.
      Note: If you don't have access to the ld conf file, you can also add the directory to the LD_LIBRARY_PATH variable. This is pretty ugly and not quite the best practice, but sometimes you don't have any other options. You can add the directory to LD_LIBRARY_PATH this way:
      [rechosen@localhost ~]$ export LD_LIBRARY_PATH="$LD_LIBRARY_PATH:/your/library/directory"
      Of course, replace /your/library/directory with the applicable directory in your case. Note that the LD_LIBRARY_PATH will also have to hold /your/library/directory when running the program you compiled.
  2. (configure:) (error:) cannot find header (file) .h OR (configure:) (error:) (header) (file) .h missing! OR
    • The configure script can't find a .h file required for compilation. This error is similar to the one above, as it requires you to install the -dev or -devel version of a certain package. However, it is usually less clear which package should be installed, as can be a very generic name. Try searching the web for .h to find out which package it belongs to, then try installing that package (including its -dev or -devel version, if available) using your distro's package manager.
  3. (configure:) (error:) no acceptable cc found in
    • Your gcc installation is either missing or the CC environment variable is not set. Check if the package gcc is installed, using your distro's package manager. If it isn't, install it. If it is installed, however, try using this command:
      [rechosen@localhost ~]$ export CC="/usr/bin/cc"
      If that worked, you can add the command to your /etc/profile (a file full of commands that are executed whenever any user logs in) so you won't have to set it again.
  4. (configure:) (error:) C++ preprocessor "/lib/cpp" fails sanity check
    • Your g++ package is either missing or corrupted. Please use your distro's package manager (or any other method to find and install packages) to search for g++ and install the corresponding package. Note that quite some distro's do not call the package g++. Fedora, for example, uses the packagename gcc-c++ in its yum repositories. If you can't find g++, try searching for c++, cpp and/or gcc.
  5. (configure:) (error:) C++ preprocessor "CC (-E)" fails sanity check
    • This is caused by a strange bug in certain versions of libtool that makes the configure script check for all compilers supported by libtool. The quickest solution is to install g++ (see the solution above this one).

Make errors

As make errors usually are too specific to make a nice list of generic ones, I will give you a list of general things to do that might help:
  • If you're compiling using gcc 4 (use gcc -dumpversion to find out), try using an older compiler version. First, make sure that some older version is installed. This can usually be detected this way:
    [rechosen@localhost ~]$ ls /usr/bin/gcc*
    If that returns something like this:
    /usr/bin/gcc /usr/bin/gcc32
    Then you can use, in this case, the gcc32 command to compile with an older gcc version. If not, try using your distro's package manager to search for older versions of gcc (usually called something like compat-gcc or gcc-). After installing, you should be able to detect the alternative gcc version using the ls command above. Tell the ./configure, make and make install sequence to use the older gcc version in a way like this:
    [rechosen@localhost ~]$ CC="/usr/bin/gcc32" ./configure
    [rechosen@localhost ~]$ CC="/usr/bin/gcc32" make
    [rechosen@localhost ~]$ CC="/usr/bin/gcc32" make install
    Note: in most cases, you can leave the /usr/bin away and just put the gcc executable name. However, some non-standard Makefiles might handle it in a different way. Therefore, including the full path is the safest option.
    Of course, replace the /usr/bin/gcc32 with the location of your alternative gcc command.
  • Sometimes make errors are just caused by a plain bug. Try obtaining the latest development version of the software (using their cvs, svn or similar repository, or by downloading a nightly snapshot) and try compiling that one to see if they fixed the bug there.
  • Make errors can also be caused by having wrong versions of certain libraries / programs. Especially very new and very old packages suffer from this problem. Have a look at the dependencies of the package (they are usually listed somewhere on the site of the software) and compare the version numbers there with the version numbers on your own computer (they can usually be found using the search function of your distro's package manager). If the version numbers on your system are way higher than the ones on the package's site, you are probably trying to compile a very old package. If you really need to compile it, try downgrading the dependencies. However, it usually is a better option to search for an other way to install the package or to look for an alternative. If the version numbers on your system are way lower than the ones on the package's site, you are either trying to compile a bleeding-edge package, or your distro is quite old, or both =). You could try updating the required libraries / programs or compiling an older version of the program. Also, have a look if a nice package made for your distro of the program exists. Installing such a package is usually easier than trying to deal with compilation errors.
  • Another thing to try is searching the web for your specific error. If you don't find anything useful, try stripping away things like line numbers (they can change with versions), version numbers (you can replace them with an asterisk if they are contained in (file) names) and non-alphanumerical characters like quotes, as they influence the search engine's seeking. You can usually find a lot of information on mailing lists. Sometimes, a patch is provided that will fix the source code. Patches can be applied this way:
    [rechosen@localhost ~]$ patch -Np1 -i
    Note that you will need to be in the source directory to apply a patch.

Make install errors

These errors usually are quite easy to understand, but I'll document them anyway. There are two frequent causes that'll stop you from succesfully using make install:
  • You do not have root permission. Try running make install using sudo or try becoming root using su. Sudo should be used this way:
    [rechosen@localhost ~]$ sudo make install
    It will ask for a password; this usually is either your own password or the system root password. You can use su to become root this way:
    [rechosen@localhost ~]$ su
    This command will also ask for a password, but it always is the system root password. After becoming root, just run make install as you'd do normally. And after that, don't forget to return to your normal user again if you used su. You can do this by pressing Ctrl + D or, if that didn't work, typing 'exit' or 'logout' and then pressing enter. However, this is only recommended if you became root using su. The sudo program only runs a command with root permissions, it doesn't log you in as root.
  • The package you just compiled doesn't have the install target. In this case you will have to copy the compiled binaries to a bin directory yourself. If you do an ls in the source directory, executable files should appear light-green. These files could be copied to /usr/bin (or /usr/local/bin, if you prefer) in a way like this:
    [rechosen@localhost ~]$ cp /usr/bin
    However, this will make a mess of your /usr directory if you use it too much. You could also add the directory in which the executable is located to your PATH variable. Go to the directory, get the whole path of it this way:
    [rechosen@localhost ~]$ pwd
    Then paste the output of pwd into this command:
    [rechosen@localhost ~]$ export PATH="$PATH:"
    If you can just run the command now, it worked. Add the export command you ran to your /etc/profile, so you won't have to type it again.
    I agree that this isn't really a clean and easy way, but sometimes developers don't take the time to create a (proper) install target. We should not be angry with them: think of all the work they do to let us enjoy useful and/or funny programs =).

Other problems

Here is a list of some other general problems, with solutions:
  • Everything went alright, but when I type the command I just installed bash says it cannot be found. This is usually caused by make install installing everything in /usr/local or in /opt/. Have a look at the output of make install: where did it copy the files to? Try adding the bin directory of that location to your PATH variable (the following example assumes the package was installed to /usr/local):
    [rechosen@localhost ~]$ export PATH="$PATH:/usr/local/bin"
    You can just replace /usr/local/bin with the bin directory in which the executables of your package were installed. If this works, add the line to your /etc/profile so you won't have to type this again and again. By the way, you can control the place in which the package will be installed by specifying this option when running the configure script:
    [rechosen@localhost ~]$ ./configure --prefix=/usr
    Replace /usr if necessary with the directory in which you'd like to have the package installed. Note that you are only setting the prefix; the binaries will be installed in a subdirectory of the prefix, just like the libraries, header files and so on. When using the above prefix, for example, you will find the binaries in /usr/bin.
  • I want to install a very old version of a package, but I can't find the source archive of it on the internet. You still have a small chance. Try searching for rpm's of the version you want and download the corresponding src rpm. Unpack it this way:
    [rechosen@localhost ~]$ rpm2cpio | cpio -idv
    Now, use the source file that should have been extracted from the source rpm.

Final words

This tutorial is not finished yet. I plan to update it every now and then with solutions to requests from users. Therefore, I ask you to comment on it and say what you'd like to see documented in it. Remember that this tutorial is about generic troubleshooting. Don't ask me how to make a certain version of a certain program compile. Anyway, I hope this tutorial has been useful to you. Thanks for reading and good luck with that immersively complicated thing called compiling!

Source : http://www.linuxtutorialblog.com

Rahasia : Disabling unused daemons to speed up your boot sequence

Many Linux distros usually start a lot of daemons when booting, resulting in a long wait before you can get to work after powering on your machine. Some of those daemons are rarely used (or even not al all) by the majority of users. This tutorial describes how to disable unused or rarely used daemons in a proper way, resulting in faster boot sequences and less CPU load.
Note: Although this tutorial aims to be system-friendly and not dangerous, please do not disable any service if you don't know what you are doing. Especially on server systems, (accidently) disabling an important service can have serious consequences. This tutorial is provided as-is, without any warranty and so on. Just be careful, ok? =)
Another note: This tutorial uses the words "service" and "daemon". These words have an almost identical meaning, although service focuses a bit more on what a process does, or, in other words, which service a process provides. The word daemon refers to the "physical" (how could software ever be physical?) process.

First Part: The how-to (or howto)

Indeed, this tutorial is splitted in two parts to allow easy reading. The first part explains how to disable those services (and which services to disable) in a short and clear way. The second part (the tutorial part) explains what's behind it, and allows deeper insight in Linux booting. If you don't want and/or need that deeper insight, don't read the second part =).

Finding out what's running on your system

Most distros feature some kind of tool which allows you to manage the daemons that are started on your computer when booting. The most common one is chkconfig, which features a commandline interface. You can list all processes that are started when booting to graphical mode with the following command:
[rechosen@localhost ~]$ /sbin/chkconfig --list | grep "5:on"
When running a text-mode system, you will usually boot to runlevel 3. To see the processes that are started at boot time on these systems, use this command:
[rechosen@localhost ~]$ /sbin/chkconfig --list | grep "3:on"
Many distros also feature a GUI for daemon startup configuration. A well-known one is serviceconf. You will usually find such a GUI in areas like "System" or "Configuration", named like "Services" or "Boot configuration" or "Daemons" (note that the second one can also be a configuration GUI for the bootloader, like GRUB or lilo, which is not what we're dealing with right now). Using a GUI configurator is recommended, because they usually are more tuned for your distro than chkconfig.
The following section contains a list of daemons that can be disabled in certain cases. Compare the list of daemons that are started on your system to the list below, read the descriptions and determine whether or not it would be a good idea to disable it. Once you made up your mind on which services you're going to disable, continue to Disabling Daemons.

Common unused / rarely used daemons

The following list contains daemons that may not be used by a 'normal' end-user. You can compare the list of daemons started up on your system to this list, and see if you could safely disable some of those daemons.
  • Bluetooth
    • hcid, sdpd and hidd (These daemons provide Bluetooth services and are unnecessary if you don't have any Bluetooth hardware)
  • Printing
    • cups and cups-config-daemon (These daemons provide printer services and are unnecessary if you don't have any printer hardware attached to your local pc or to a network pc)
    • hpiod and hpssd (These daemons provide extensive support for HP printers. They can safely be disabled if you never print using an HP printer)
  • Console
    • gpm (This daemon provides mouse support for text-based applications, like Midnight Commander. It also provides copying/pasting with the middle mouse button in console environments. Can be disabled if you do not use the console much)
  • Webserver
    • httpd (This daemon provides web hosting services, and is unecessary on workstations and servers that do not host any websites or webinterfaces)
    • mysqld and postgresqld (These daemons provide database backend services. You can usually disable them if you're not running a webserver, although some applications use these databases for their data storage)
  • Firewall
    • netfilter/iptables (This daemon provides firewall services. Those are not that necessary if you're behind a router or smoothwall with a built-in firewall)
  • InfraRed
    • irda (This daemon enables your computer to communicate with other devices using IR (InfraRed) hardware. If you haven't got such hardware, you can safely disable this service)
    • lircd (This daemon provides remote control support using IR (InfraRed) receivers. Can be disabled if you don't have hardware capable of receiving IR signals)
  • Multiple CPU's
    • irqbalance (This daemon balances interrupts over multiple CPU's in the system. Can be disabled if you don't have multiple CPU's or a dual core processor)
  • Software RAID
    • mdmonitor, mdadm and mdmpd (These daemons provide information about and management functionality over software RAID devices. They are unnecessary if you don't use software RAID)
  • DNS Server
    • named (also known as BIND) (This daemon provides DNS server functionality. It is usually not needed on workstations)
  • Remote kernel logging
    • netdump, netcrashdump and netconsole (These services provide functionality for kernel logging and debugging over network connections. Only necessary if you want to view your kernel's log and debugging messages on an other computer)
  • Fileservers
    • NFS server
      • nfs (This daemon provides NFS server functionality, allowing other computers with NFS clients to connect to your computer and access files. You can disable this if you don't need/want others to access your system using NFS)
      • portmap (This daemon manages RPC connections, used by protocols like NFS and NIS. Only needed on computers that need to act as a server)
      • rpcsvcgssd (This daemon manages RPCSEC GSS contexts for the NFSv4 server and is not needed unless you are running an NFS server)
    • Samba server
      • smbd and nmbd (These daemons provides other computers (Windows computers, too) with access to your files. This is not needed if you don't want others to be able to access your files over the network)
  • Network Authentication
    • nscd (This daemon handles passwd and group lookups and caches their results. Only needed when using a 'slow' name service, like NIS, NIS+, LDAP, or hesiod)
    • portmap (This daemon manages RPC connections, used by protocols like NFS and NIS. Only needed on computers that need to act as a server)
  • Remote time setting
    • ntpd (This daemon sets your system time to a value it retrieves from a so-called ntp server, which usually serves a very accurate time. Although it is a useful feature, it tends to slow your system's startup a lot, especially if the server cannot be found)
  • Process Accounting
    • psacct (also known as acct) (This daemon provides process accounting, which gives a more detailed insight into the execution of commands on your system. This is usually not needed unless you are running a server that is accessed by a lot of people that you cannot trust entirely)
  • Plaintext Authentication Requests
    • saslauthd (This daemon handles SASL Plaintext Authentication Requests, and is only required on a server that needs to communicate using SASL mechanisms)
  • Mailserver
    • sendmail (This daemon sends and forwards email messages, acting as a server. You don't need this daemon to be able to send a normal message. It is only needed if you need your computer to act as a mailserver)
    • spamd (also known as Spamassassin) (This daemon checks incoming mail messages for spam. This can usually be disabled, but keep in mind that some mail clients, like KMail, can use spamd's functionality)
  • SSH Server
    • sshd (This daemon allows remote login to your computer using the SSH protocol. It can be disabled if you don't want/need this access)
  • VNC Server
    • vncserver or xvnc (This daemon allows others to get a virtual graphical Desktop that actually runs on your computer)
  • Task Scheduler
    • cron (and variants, like vixie-cron...) (This daemon runs periodic tasks on your system, like updating the search index or the manpage index, but also rotating logfiles. This one is generally required for a server system to run correctly, but workstations may be able to run without it)

Disabling daemons

When using a GUI to manage the daemons started at boot-time, you will usually be able to disable them by simply unchecking a checkbox. When using chkconfig, you can use the following syntax:
[rechosen@localhost ~]$ /sbin/chkconfig name off
Replace "name" with the name of the daemon you want to disable. If you accidently disabled a wrong daemon, you can turn it on again this way:
[rechosen@localhost ~]$ /sbin/chkconfig name reset
You might think this is illogical, that it should be:
[rechosen@localhost ~]$ /sbin/chkconfig name on
Well, it shouldn't. The above command would turn on the starting of the daemon for a fixed set of runlevels, no matter what the previous values were. That's not exactly what we want, as we want it to switch it back to the old state. The word "reset" tells chkconfig to restore the values specified in the init script that contains the instructions on how to start the daemon. These values are (or should be) the defaults. Remember that the default values are not always equal to the old values, but they will mostly be closer to them than the values that "on" implies. You might need to modify a select amount of runlevels to correct it. You can do this by specifying which runlevels should be altered, like this:
[rechosen@localhost ~]$ /sbin/chkconfig --level 35 name on
The above command would turn on the startup of the daemon "name" for the runlevels 3 and 5. The argument for "--level" is just a string of runlevel number, without separation. Another example:
[rechosen@localhost ~]$ /sbin/chkconfig --level 235 name on

Second part: The tutorial

This part will explain what's behind all the commands above. If you want to know how Linux "knows" what to start at boot time, what a "runlevel" is and why there usually are 7 of them (or, arguably, 8), read on.
Note: This part will not be right for every distro. There are a lot of differences between distros at this point, so I tried to expose the most default configuration.

How Linux "knows" what to start at boot time

When you boot up a Linux computer, you'll usually see the bootloader (after the BIOS has done its part of the booting process). The bootloader, usually Lilo or GRUB, is configured to load the kernel of the Linux into the memory of your computer. The kernel then leaves the bootloader behind and continues booting on its own, initializing hardware and making itself ready to start running init. And init is the process we're looking for: it is the first process run, and it spawns all other processes. But where does init look to know which processes to start? The short answer is: in /etc/rc*.d/ (usually). But that's not the full answer. To understand how it uses the files in those directories, we will first need to understand what runlevels are.

Runlevels

A runlevel is the process state in which a system can reside. For example: runlevel 1 usually is the rescue mode, it boots the system starting as few processes as possible, providing the user with a root-access console, without networking functionality and without any GUI. On the other hand, runlevel 5 usually is the full-fledged graphical multi-user mode. There also are special runlevels that you shouldn't boot to, but that you could switch to after booting: for example, switching to runlevel 0 (zero) shuts down your computer (don't try this until you read the full tutorial) and switching to runlevel 6 will make your system reboot itself. Now for the full list of runlevels and their common configuration:
  • 0: Shuts down the system (to be switched to after booting)
  • 1: Boots the system to a rescue mode
  • 2: Boots the system to a multi-user mode without networking functionality (some systems, like Debian, use this as a full-fledged mode)
  • 3: Boots the system to a multi-user mode with networking functionality (some systems, like Debian, use this as a full-fledged mode)
  • 4: Generally not used (sometimes it is the same as runlevel 5 or 3)
  • 5: Boots the system to a full-fledged graphical multi-user mode (with networking, of course)
  • 6: Reboots the system (to be switched to after booting)
  • (s or S: Usually similar or equal to runlevel 1)
As the last runlevel is not always considered a real runlevel (it is then called an alias), the number of runlevels is usually seven, but arguably eight. You can switch between all runlevels after having booted, although 0 and 6 will (of course) require you to boot again before you can switch again. Switching between runlevels is usually done with the init command, like this:
[rechosen@localhost ~]$ init 3
The above command would (run as root or with root permissions) switch your system to runlevel 3, unless it's already running in runlevel 3 (replace the 3 with an other digit if you want to switch to an other runlevel). When switching between runlevels, init terminates the processes that were running in the old runlevel which should not run in the new one (these are zero processes when booting and all processes when shutting down or rebooting) and starts the processes that were not running in the old runlevel which should run in the new runlevel (these are zero processes when shutting down or rebooting, but when booting, it depends on the runlevel you're booting to). And now we can go on to the way init "knows" what to start and what to stop.

What to start and what to stop?

When the init process is started by the kernel, it first looks in the /etc/inittab file to see what to do in case of a certain runlevel. This file usually tells init to look in the corresponding /etc/rcX.d/ directory, where X is the runlevel. For example, when booting to runlevel 5, init will run the scripts in /etc/rc5.d/ (please note (again) that this does not apply to all distros). These "scripts" usually are symlinks to the corresponding service management scripts in /etc/init.d/ (or /etc/rc.d/init.d/). But how can such a script understand whether init wants it to start or stop the service? Well, when init wants the script to start the process, it will run the script with "start" as the first argument. When wanting the script to stop the service, init will pass "stop" as the first argument. You can also do this yourself if you want to start or stop a service. For example:
[rechosen@localhost ~]$ /etc/init.d/ntpd stop
The above example would stop the ntpd daemon. To start it again use the following command:
[rechosen@localhost ~]$ /etc/init.d/ntpd start
Stopping and starting can usually be combined in the following way.
[rechosen@localhost ~]$ /etc/init.d/ntpd restart
This is useful in case you want a daemon to re-read its config files. Depending on the service the script was written for (and the script itself), other arguments may also be supplied.
Anyway, let's get back to the /etc/rcX.d/ directory. This directory is filled with files named like "K59somedaemon" and "S10anotherdaemon". I'll give a short explanation:
  • "K" means "kill" and "S" means "start": The symlinks starting with "K" will be executed with a "stop" argument by init, and the symlinks starting with "S" will be executed with a "start" argument.
  • The two digits after "K" or "S" don't mean anything really special, they are just used for sorting. Symlinks that need to be run before certain other ones should have a lower number than the other ones.
  • The name of the daemon after it is actually not necessary for init, but it's good practice for sysadmins so they can instantly see what the symlink is for.
Finally, you should know that pretty much any distro has got some check somewhere to ensure that already running processes are not started again (which would result into two interferring processes, unless the daemon itself checks if there isn't an other instance running) and that already terminated processes will not be "reterminated". This is usually done by some special program or script that is called to do the actual starting.

Final words

Well, I hope this tutorial helped you cutting on the CPU load and boot time of your computer and understanding what makes a Linux system come up after you turned your computer on. If you have any suggestions (for example: another daemon that seems to be unnecessary in certain cases or another way to manage the startup of daemons) please leave a comment. Thanks for reading and God bless! =)

Source : http://www.linuxtutorialblog.com

Rahasia : The best tips & tricks for bash, explained

The bash shell is just amazing. There are so many tasks that can be simplified using its handy features. This tutorial tells about some of those features, explains what exactly they do and learns you how to use them.
Difficulty: Basic - Medium

Running a command from your history

Sometimes you know that you ran a command a while ago and you want to run it again. You know a bit of the command, but you don't exactly know all options, or when you executed the command. Of course, you could just keep pressing the Up Arrow until you encounter the command again, but there is a better way. You can search the bash history in an interactive mode by pressing Ctrl + r. This will put bash in history mode, allowing you to type a part of the command you're looking for. In the meanwhile, it will show the most recent occasion where the string you're typing was used. If it is showing you a too recent command, you can go further back in history by pressing Ctrl + r again and again. Once you found the command you were looking for, press enter to run it. If you can't find what you're looking for and you want to try it again or if you want to get out of history mode for an other reason, just press Ctrl + c. By the way, Ctrl + c can be used in many other cases to cancel the current operation and/or start with a fresh new line.

Repeating an argument

You can repeat the last argument of the previous command in multiple ways. Have a look at this example:
[rechosen@localhost ~]$ mkdir /path/to/exampledir
[rechosen@localhost ~]$ cd !$
The second command might look a little strange, but it will just cd to /path/to/exampledir. The "!$" syntax repeats the last argument of the previous command. You can also insert the last argument of the previous command on the fly, which enables you to edit it before executing the command. The keyboard shortcut for this functionality is Esc + . (a period). You can also repeatedly press these keys to get the last argument of commands before the previous one.

Some keyboard shortcuts for editing

There are some pretty useful keyboard shortcuts for editing in bash. They might appear familiar to Emacs users:
  • Ctrl + a => Return to the start of the command you're typing
  • Ctrl + e => Go to the end of the command you're typing
  • Ctrl + u => Cut everything before the cursor to a special clipboard
  • Ctrl + k => Cut everything after the cursor to a special clipboard
  • Ctrl + y => Paste from the special clipboard that Ctrl + u and Ctrl + k save their data to
  • Ctrl + t => Swap the two characters before the cursor (you can actually use this to transport a character from the left to the right, try it!)
  • Ctrl + w => Delete the word / argument left of the cursor
  • Ctrl + l => Clear the screen

Dealing with jobs

If you've just started a huge process (like backupping a lot of files) using an ssh terminal and you suddenly remember that you need to do something else on the same server, you might want to get the huge process to the background. You can do this by pressing Ctrl + z, which will suspend the process, and then executing the bg command:
[rechosen@localhost ~]$ bg
[1]+ hugeprocess &
This will make the huge process continue happily in the background, allowing you to do what you need to do. If you want to background another process with the huge one still running, just use the same steps. And if you want to get a process back to the foreground again, execute fg:
[rechosen@localhost ~]$ fg
hugeprocess
But what if you want to foreground an older process that's still running? In a case like that, use the jobs command to see which processes bash is managing:
[rechosen@localhost ~]$ jobs
[1]- Running hugeprocess &
[2]+ Running anotherprocess &
Note: A "+" after the job id means that that job is the 'current job', the one that will be affected if bg or fg is executed without any arguments. A "-" after the job id means that that job is the 'previous job'. You can refer to the previous job with "%-".
Use the job id (the number on the left), preceded by a "%", to specify which process to foreground / background, like this:
[rechosen@localhost ~]$ fg %3
And:
[rechosen@localhost ~]$ bg %7
The above snippets would foreground job [3] and background job [7].

Using several ways of substitution

There are multiple ways to embed a command in an other one. You could use the following way (which is called command substitution):
[rechosen@localhost ~]$ du -h -a -c $(find . -name *.conf 2>&-)
The above command is quite a mouthful of options and syntax, so I'll explain it.
  • The du command calculates the actual size of files. The -h option makes du print the sizes in human-readable format, the -a tells du to calculate the size of all files, and the -c option tells du to produce a grand total. So, "du -h -a -c" will show the sizes of all files passed to it in a human-readable form and it will produce a grand total.
  • As you might have guessed, "$(find . -name *.conf 2>&-)" takes care of giving du some files to calculate the sizes of. This part is wrapped between "$(" and ")" to tell bash that it should run the command and return the command's output (in this case as an argument for du). The find command searches for files named .conf in the current directory and all accessible subdirectories. The "." indicates the current directory, the -name option allows to specify the filename of the file to search for, and "*.conf" is an expression that matches any string ending with the character sequence ".conf".
  • The only thing left to explain is the "2>&-". This part of the syntax makes bash discard the errors that find produces, so du won't get any non-filename input. There is a huge amount of explanation about this syntax near the end of the tutorial (look for "2>&1" and further).
And there's another way to substitute, called process substitution:
[rechosen@localhost ~]$ diff <(ps axo comm) <(ssh user@host ps axo comm)
The command in the snippet above will compare the running processes on the local system and a remote system with an ssh server. Let's have a closer look at it:
  • First of all, diff. The diff command can be used to compare two files. I won't tell much about it here, as there is an extensive tutorial about diff and patch on this site.
  • Next, the "<(" and ")". These strings indicate that bash should substitute the command between them as a process. This will create a named pipe (usually in /dev/fd) that, in our case, will be given to diff as a file to compare.
  • Now the "ps axo comm". The ps command is used to list processes currently running on the system. The "a" option tells ps to list all processes with a tty, the "x" tells ps to list processes without a tty, too, and "o comm" tells ps to list the commands only ("o" indicates the starting of a user-defined output declaration, and "comm" indicates that ps should print the COMMAND column).
  • The "ssh user@host ps axo comm" will run "ps axo comm" on a remote system with an ssh server. For more detailed information about ssh, see this site's tutorial about ssh and scp.
Let's have a look at the whole snippet now:
  • After interpreting the line, bash will run "ps axo comm" and redirect the output to a named pipe,
  • then it will execute "ssh user@host ps axo comm" and redirect the output to another named pipe,
  • and then it will execute diff with the filenames of the named pipes as argument.
  • The diff command will read the output from the pipes and compare them, and return the differences to the terminal so you can quickly see what differences there are in running processes (if you're familiar with diff's output, that is).
This way, you have done in one line what would normally require at least two: comparing the outputs of two processes.
And there even is another way, called xargs. This command can feed arguments, usually imported through a pipe, to a command. See the next chapter for more information about pipes. We'll now focus on xargs itself. Have a look at this example:
[rechosen@localhost ~]$ find . -name *.conf -print0 | xargs -0 grep -l -Z mem_limit | xargs -0 -i cp {} {}.bak
Note: the "-l" after grep is an L, not an i.
The command in the snippet above will make a backup of all .conf files in the current directory and accessible subdirectories that contain the string "mem_limit".
  • The find command is used to find all files in the current directory (the ".") and accessible subdirectories with a filename (the "-name" option) that ends with ".conf" ("*.conf" means ".conf"). It returns a list of them, with null characters as separators ("-print0" tells find to do so).
  • The output of find is piped (the "|" operator, see the next chapter for more information) to xargs. The "-0" option tells xargs that the names are separated by null characters, and "grep -l -Z mem_limit" is the command that the list of files will be feeded to as arguments. The grep command will search the files it gets from xargs for the string "mem_limit", returning a list of files (the -l option tells grep not to return the contents of the files, but just the filenames), again separated by null characters (the "-Z" option causes grep to do this).
  • The output of grep is also piped, to "xargs -0 -i cp {} {}.bak". We know what xargs does, except for the "-i" option. The "-i" option tells xargs to replace every occasion of the specified string with the argument it gets through the pipe. If no string is specified (as in our case), xargs will assume that it should replace the string "{}". Next, the "cp {} {}.bak". The "{}" will be replaced by xargs with the argument, so, if xargs got the file "sample.conf" through the pipe, cp will copy the file "sample.conf" to the file "sample.conf.bak", effectively making a backup of it.
These substitutions can, once mastered, provide short and quick solutions for complicated problems.

Piping data through commands

One of the most powerful features is the ability to pipe data through commands. You could see this as letting bash take the output of a command, then feed it to an other command, take the output of that, feed it to another and so on. This is a simple example of using a pipe:
[rechosen@localhost ~]$ ps aux | grep init
If you don't know the commands yet: "ps aux" lists all processes executed by a valid user that are currently running on your system (the "a" means that processes of other users than the current user should also be listed, the "u" means that only processes executed by a valid user should be shown, and the "x" means that background processes (without a tty) should also be listed). The "grep init" searches the output of "ps aux" for the string "init". It does so because bash pipes the output of "ps aux" to "grep init", and bash does that because of the "|" operator.
The "|" operator makes bash redirect all data that the command left of it returns to the stdout (more about that later) to the stdin of the command right of it. There are a lot of commands that support taking data from the stdin, and almost every program supports returning data using the stdout.
The stdin and stdout are part of the standard streams; they were introduced with UNIX and are channels over which data can be transported. There are three standard streams (the third one is stderr, which should be used to report errors over). The stdin channel can be used by other programs to feed data to a running process, and the stdout channel can be used by a program to export data. Usually, stdout output (and stderr output, too) is received by the terminal environment in which the program is running, in our case bash. By default, bash will show you the output by echoing it onto the terminal screen, but now that we pipe it to an other command, we are not shown the data.
Please note that, as in a pipe only the stdout of the command on the left is passed on to the next one, the stderr output will still go to the terminal. I will explain how to alter this further on in this tutorial.
If you want to see the data that's passed on between programs in a pipe, you can insert the "tee" command between it. This program receives data from the stdin and then writes it to a file, while also passing it on again through the stdout. This way, if something is going wrong in a pipe sequence, you can see what data was passing through the pipes. The "tee" command is used like this:
[rechosen@localhost ~]$ ps aux | tee filename | grep init
The "grep" command will still receive the output of "ps aux", as tee just passes the data on, but you will be able to read the output of "ps aux" in the file after the commands have been executed. Note that "tee" tries to replace the file if you specify the command like this. If you don't want "tee" to replace the file but to append the data to it instead, use the -a option, like this:
[rechosen@localhost ~]$ ps aux | tee -a filename | grep init
As you have been able to see in the above command, you can place a lot of command with pipes after each other. This is not infinite, though. There is a maximum command-line length, which is usually determined by the kernel. However, this value usually is so big that you are very unlikely to hit the limit. If you do, you can always save the stdout output to a file somewhere inbetween and then use that file to continue operation. And that introduces the next subject: saving the stdout output to a file.

Saving the stdout output to a file

You can save the stdout output of a command to a file like this:
[rechosen@localhost ~]$ ps aux > filename
The above syntax will make bash write the stdout output of "ps aux" to the file filename. If filename already exists, bash will try to overwrite it. If you don't want bash to do so, but to append the output of "ps aux" to filename, you could do that this way:
[rechosen@localhost ~]$ ps aux >> filename
You can use this feature of bash to split a long line of pipes into multiple lines:
[rechosen@localhost ~]$ command1 | command2 | ... | commandN > tempfile1
[rechosen@localhost ~]$ cat tempfile1 | command1 | command2 | ... | commandN > tempfile2
And so on. Note that the above use of cat is, in most cases, a useless one. In many cases, you can let command1 in the second snippet read the file, like this:
[rechosen@localhost ~]$ command1 tempfile1 | command2 | ... | commandN > tempfile2
And in other cases, you can use a redirect to feed a file to command1:
[rechosen@localhost ~]$ command1 < tempfile1 | command2 | ... | commandN > tempfile2
To be honest, I mainly included this to avoid getting the Useless Use of Cat Award =).
Anyway, you can also use bash's ability to write streams to file for logging the output of script commands, for example. By the way, did you know that bash can also write the stderr output to a file, or both the stdout and the stderr streams?

Playing with standard streams: redirecting and combining

The bash shell allows us to redirect streams to other streams or to files. This is quite a complicated feature, so I'll try to explain it as clearly as possible. Redirecting a stream is done like this:
[rechosen@localhost ~]$ ps aux 2>&1 | grep init
In the snippet above, "grep init" will not only search the stdout output of "ps aux", but also the stderr output. The stderr and the stdout streams are combined. This is caused by that strange "2>&1" after "ps aux". Let's have a closer look at that.
First, the "2". As said, there are three standard streams (stin, stdout and stderr).These standard streams also have default numbers:
  • 0: stdin
  • 1: stdout
  • 2: sterr
As you can see, "2" is the stream number of stderr. And ">", we already know that from making bash write to a file. The actual meaning of this symbol is "redirect the stream on the left to the stream on the right". If there is no stream on the left, bash will assume you're trying to redirect stdout. If there's a filename on the right, bash will redirect the stream on the left to that file, so that everything passing through the pipe is written to the file.
Note: the ">" symbol is used with and without a space behind it in this tutorial. This is only to keep it clear whether we're redirecting to a file or to a stream: in reality, when dealing with streams, it doesn't matter whether a space is behind it or not. When substituting processes, you shouldn't use any spaces.
Back to our "2>&1". As explained, "2" is the stream number of stderr, ">" redirects the stream somewhere, but what is "&1"? You might have guessed, as the "grep init" command mentioned above searches both the stdout and stderr stream, that "&1" is the stdout stream. The "&" in front of it tells bash that you don't mean a file with filename "1". The streams are sent to the same destination, and to the command receiving them it will seem like they are combined.
If you'd want to write to a file with the name "&1", you'd have to escape the "&", like this:
[rechosen@localhost ~]$ ps aux > \&1
Or you could put "&1" between single quotes, like this:
[rechosen@localhost ~]$ ps aux > '&1'
Wrapping a filename containing problematic characters between single quotes generally is a good way to stop bash from messing with it (unless there are single quotes in the string, then you'd have have escape them by putting a \ in front of them).
Back again to the "2>&1". Now that we know what it means, we can also apply it in other ways, like this:
[rechosen@localhost ~]$ ps aux > filename 2>&1
The stdout output of ps aux will be sent to the file filename, and the stderr output, too. Now, this might seem unlogical. If bash would interpret it from the left to the right (and it does), you might think that it should be like:
[rechosen@localhost ~]$ ps aux 2>&1 > filename
Well, it shouldn't. If you'd execute the above syntax, the stderr output would just be echoed to the terminal. Why? Because bash does not redirect to a stream, but to the current final destination of the stream. Let me explain it:
  • First, we're telling bash to run the command "ps" with "aux" as an argument.
  • Then, we're telling to redirect stderr to stdout. At the moment, stdout is still going to the terminal, so the stderr output of "ps aux" is sent to the terminal.
  • After that, we're telling bash to redirect the stdout output to the file filename. The stdout output of "ps aux" is sent to this file indeed, but the stderr output isn't: it is not affected by stream 1.
If we put the redirections the other way around ("> filename" first), it does work. I'll explain that, too:
  • First, we're telling bash to run the command "ps" with "aux" as an argument (again).
  • Then, we're redirecting the stdout to the file filename. This causes the stdout output of "ps aux" to be written to that file.
  • After that, we're redirecting the stderr stream to the stdout stream. The stdout stream is still pointing to the file filename because of the former statement. Therefore, stderr output is also written to the file.
Get it? The redirects cause a stream to go to the same final destination as the specified one. It does not actually merge the streams, however.
Now that we know how to redirect, we can use it in many ways. For example, we could pipe the stderr output instead of the stdout output:
[rechosen@localhost ~]$ ps aux 2>&1 > /dev/null | grep init
The syntax in this snippet will send the stderr output of "ps aux" to "grep init", while the stdout output is sent to /dev/null and therefore discarded. Note that "grep init" will probably not find anything in this case as "ps aux" is unlikely to report any errors.
When looking more closely to the snippet above, a problem arises. As bash reads the command statements from the left to the right, nothing should go through the pipe, you might say. At the moment that "2>&1" is specified, stdout should still point to the terminal, shouldn't it? Well, here's a thing you should remember: bash reads command statements from the left to the right, but, before that, determines if there are multiple command statements and in which way they are separated. Therefore, bash already read and applied the "|" pipe symbol and stdout is already pointing to the pipe. Note that this also means that stream redirections must be specified before the pipe operator. If you, for example, would move "2>&1" to the end of the command, after "grep init", it would not affect ps aux anymore.
We can also swap the stdout and the stderr stream. This allows to let the stderr stream pass through a pipe while the stdout is printed to the terminal. This will require a 3rd stream. Let's have a look at this example:
[rechosen@localhost ~]$ ps aux 3>&1 1>&2 2>&3 | grep init
That stuff seems to be quite complicated, right? Let's analyze what we're doing here:
  • "3>&1" => We're redirecting stream 3 to the same final destination as stream 1 (stdout). Stream 3 is a non-standard stream, but it is pretty much always available in bash. This way, we're effectively making a backup of the destination of stdout, which is, in this case, the pipe.
  • "1>&2" => We're redirecting stream 1 (stdout) to the same final destination as stream 2 (stderr). This destination is the terminal.
  • "2>&3" => We're redirecting stream 2 (stderr) to the final destination of stream 3. In the first step of these three ones, we set stream 3 to the same final destination as stream 1 (stdout), which was the pipe at that moment, and after that, we redirected stream 1 (stdout) to the final destination of stream 2 at that moment, the terminal. If we wouldn't have made a backup of stream 1's final destination in the beginning, we would not be able to refer to it now.
So, by using a backup stream, we can swap the stdout and stderr stream. This backup stream does not belong to the standard streams, but it is pretty much always available in bash. If you're using it in a script, make sure you aren't breaking an earlier command by playing with the 3rd stream. You can also use stream 4, 5, 6 7 and so on if you need more streams. The highest stream number usually is 1023 (there are 1024 streams, but the first stream is stream 0, stdin). This may be different on other linux systems. Your mileage may vary. If you try to use a non-existing stream, you will get an error like this:
bash: 1: Bad file descriptor
If you want to return a non-standard stream to it's default state, redirect it to "&-", like this:
[rechosen@localhost ~]$ ps aux 3>&1 1>&2 2>&3 3>&- | grep init
Note that the stream redirections are always reset to their initial state if you're using them in a command. You'll only need to do this manually if you made a redirect using, for example, exec, as redirects made this way will last until changed manually.

Final words

Well, I hope you learned a lot from this tutorial. If the things you read here were new for you, don't worry if you can't apply them immediately. It already is useful if you just know what a statement means if you stumble upon it sometime. If you liked this, please help spreading the word about this blog by posting a link to it here and there. Thank you for reading, and good luck working with bash!

Rahasia : Manage GMail on Ubuntu

Now, go ahead to the next window. Here, most of the settings are your preferences. But here are the typical settings for anyone.If you’re a Linux fan, you’re probably using it. Ubuntu is the most widely supported Linux distribution. Almost every Linux user is familiar with it. Here’s a little tip. You can use Ubuntu’s Evolution Mail (also comes with many other Linux distributions) to manage your Gmail account. And it’s pretty easy.

First of all, you need to enable IMAP in your account. For that, go to Settings, and then click the ‘Forwarding and POP/IMAP’ tab there.


Then, enable IMAP forwarding in here.


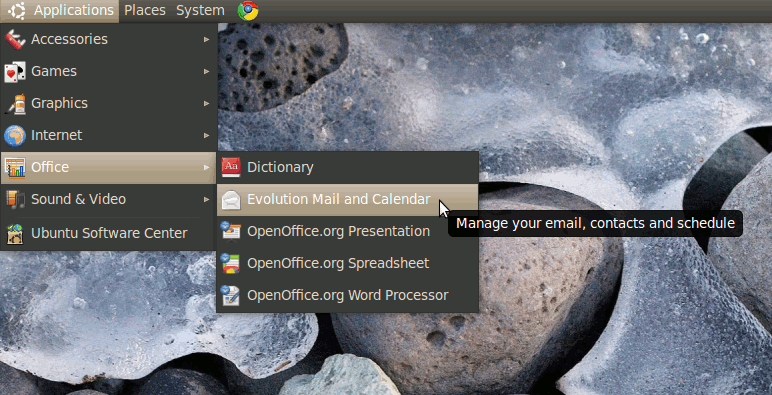
Now, just open up Evolution Mail from Applications -> Office -> Evolution Mail and Calendar and follow the following steps:


* Now, you’ll get the first time setup wizard. Click Forward in the first window.
* Then it’ll ask you if you want to setup Evolution from a backup. You don’t want to do that. So, skip this.
* Next window, type in your name and your email (yes, the Gmail one), like I have done here.


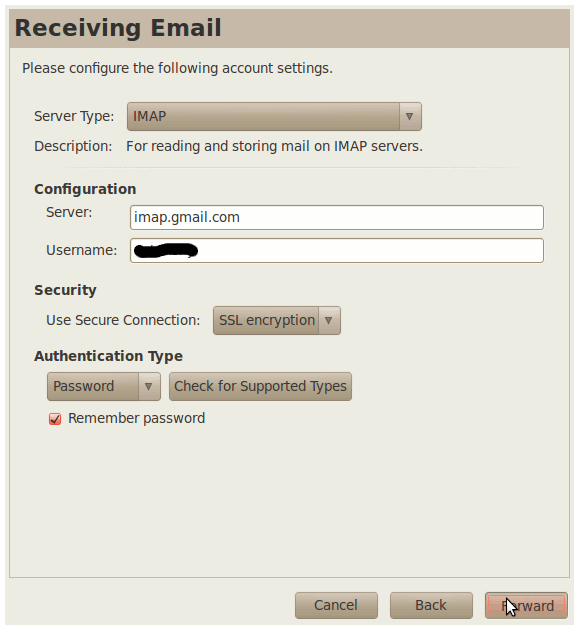
* Next, make sure you have the following settings (click the image to see a bigger version):


* Now, go ahead to the next window. Here, most of the settings are your preferences. But here are the typical settings for anyone.

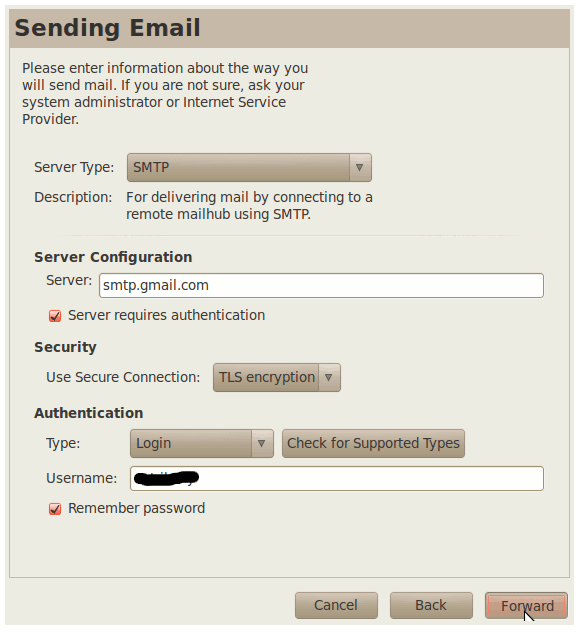
* Once, more on the next step, make sure your settings are the same as mine here:


* After this, you’re done. The next step will ask you what you want to name this mailbox. I named mine ‘Gmail’. You can choose your own name too.
* Congratulations. The next window will tell you that you’re done. You can now click ‘Apply’ there and start using Evolution.
* It will ask you your password to download your messages. Type it in, and you may check the box below it so that it will remember it for you.

Enjoy your new mail client.


Sourcce : ubuntuGeek

Selasa, 08 Februari 2011

Rahasia : Make Up Over Your Windows Look Like Ubuntu

If you are using a dual boot system with Ubuntu and Windows, you can clearly notice the limitations Linux has. And for many (myself included), Linux is extremely difficult. After awhile I came to the conclusion that I didn’t need ubuntu at all, but I still loved to look and feeling, after searching for ways to make my windows computer have that gnome feeling this is what I found:


Start with the visual style, if you haven’t already install Uxtheme Multipatcher, this will remove the limitations on your system, in order to install new themes. Then download the Human Visual Style Ubuntu Linux.


Go to C:\Windows\Resources\Themes and safe your download theme in there.

Now right click on your Desktop and click on Properties. Go to Appearance and select Human as the theme.

Now change the icons, first install Icontweaker,after that install Ubuntu Icontweaker theme.


Next, change the wallpaper on your desktop, get the Ubuntu wallpaper Here or Here.

To replace the icons for Windows Explorer, first install Styler toolbar(free), get the Ubuntu Human Theme for Styler.


Now get the famous Ubuntu Cursor


Now, what everybody wants. The alternative to Beryl on Linux. Get it Here, and get that “3D CUBE” effect.


To change the boot screen download BootSkin (it’s free): Get it Here.
And download the Ubuntu Bootskin:

To get Ubuntu Logon screen go here.

For Mozilla Firefox Web Browser, you can install the Ubuntu Theme, for Thunderbird or Dapper Retouched for Opera.

Rahasia : Fix Touchpad Issues on Asus UL30

Ubuntu 10.04 was good and bad for the UL30. While the touchpad worked flawlessly, there were some issues where the processor seemed to "lag," or catch, and you had to hit a keyboard button to make it get out of its rut. All that has seemed to be fixed in the 10.10 update, but I lost some functionality of the touchpad.
I like using a two-finger tap as mouse button 2. That way I can close tabs in chrome, open menus, etc, and use the three-finger tap as button 3, which I rarely use. I found a neat tip here on how to fix the mouse buttons. The yurivkhan patch worked great for 10.04, but in 10.10, every time I restart or awaken my computer from suspend, my mouse buttons have reverted to their default:
ben@ben-UL30A:~$ synclient -l
ben@ben-UL30A:~$ ...
               TapButton2=3
               TapButton3=2
This was a big head-scratcher, and all the advise out there on the interweb was pretty useless. Changing the settings, of course, is very simple:

ben@ben-UL30A:~$ synclient TapButton2=2 TapButton3=3
ben@ben-UL30A:~$
However, the settings would revert after a suspend or reboot. Even with yurivkhan patch. Even with adjustments to mouse buttons in the patched gconf. And it's annoying to switch the settings back every time you open your computer. I want it streamlined, and automated. This is a machine, after all. Do it for me!

The fix is head-slappingly simple. Make a bash script, I named it touchpad.sh, with the following contents:
#!bin/bash
#make the script sleep for a few seconds so that the touchpad driver will have time to load
sleep 10
synclient TapButton2=2 TapButton3=3
exit

Now your button settings should do as that script told them to do, and be in the appropriate way after reboot AND wake from suspend.
Note: You can add whatever synclient settings you want to that script, of which there are many.
Note: Make sure you set the script to be executable, and add it to your startup applications. You could even be so bold as to add it to your /usr/bin:
ben@ben-UL30A:~$ sudo cp touchpad.sh /usr/bin/
ben@ben-UL30A:~$
Now, you can just add touchpad.sh to your startup applications. I like doing it this way better. It just keeps things cleaner. I don't know, call me crazy.

Rahasia : Easily View Saved Passwords in Google Chrome

Google Chrome web browser is great: it opens quick, responds rapidly, and consistently trounces the competition in speed tests. Of course, it gets all that speed because it uses an inordinate amount of memory. Google Chrome is not in the default ubuntu repositories, but it is available from google, and will add its own repository on installation.
There is a major flaw in chrome. You know how sometimes when you log in to a website, and the browser asks, "would you like to save your password?" and you say, "ya know what, I do want you to save my password, because typing 123qwe is just too much for me." Well, you can view any of those saved password in plain text in google chrome by taking the following 3 steps.


  1. Click on the little wrench in the upper right hand corner.
  2. Click preferences
  3. Click "personal Stuff" tab
  4. Click "show saved passwords"
The fact that "show saved passwords" is even an option is dumbfounding. Why not have it asterisk out the passwords, or require a password to view passwords (or a password to view the password to view the passwords! whoa.) I recognize the other side of this argument: the only way you could access these passwords is by already having access to your computer. Yes, I know that, and security starts at home, but still, why make it so easy?

Rahasia : Fix youtube-dl...and rip them vids!

Youtube-dl is a great lil' script for download and saving youtube videos to your ubuntu computer (in fact, this script will probably work in any linux-based system that can run bash).
Youtube-dl is available in the repositories, to install it simply enter the following into a terminal:
sudo apt-get install youtube-dl

The basic usage is very easy. For instance, to download a youtube video, just enter the following:

Code:
youtube-dl [url]

Shazam! It's yours! I like to then convert the video to an mp3. There are many ways to do that, but I personally like to use ffmpeg (sudo apt-get install ffmpeg). It's versatile, CLI, and easily coupled with a youtube-dl command. Here is a command I commonly use:

Code:
youtube-dl [url] && ffmpeg -i xyz.flv xyz.mp3 && rm xyz.flv

This will download the video, convert it to a .mp3 and remove the original .flv file.

Recently, however, unfortunately, youtube/google seems to have changed their API settings, making the standard repo-version of youtube-dl non-functional. I typically get the following error, for example, when trying to download a crappy Enrique Iglesias song:
Code:
ben@ben-UL30A:~$ youtube-dl http://www.youtube.com/watch?v=Jx2yQejrrUE
[youtube] Setting language
[youtube] Jx2yQejrrUE: Downloading video webpage
[youtube] Jx2yQejrrUE: Downloading video info webpage
[youtube] Jx2yQejrrUE: Extracting video information
ERROR: unable to download video (format may not be available)

Here is the cure to what ails you. Point your browser here and right-click save-as.

Once the file is saved, enter the following code into a terminal:
chmod uo+x youtube-dl.txt
sudo mv youtube-dl.txt /usr/bin/youtube-dl

Now you can use youtube-dl and not have to worry about new API settings....for now.....

Rahasia : Install Lexmark i386 Drivers on 64-bit Ubuntu Systems

I run Ubuntu 10.10 on a 64-bit Asus UL30A. I have this ancient printer, the Lexmark X2500, that my wife got for our engagement, and it sucks. Yet it bears sentimental value, so it remains our faithful family printer. On my previous laptop--a Dell Vostro 1000 that could only handle Ubuntu 9.04--I used a Lexmark X2600 print driver and modified the config files so that they would point towards the X2500, using this recipe. It worked like a champ. There are several issues with using this method for any ubuntu distro beyond 9.04 and on 64-bit systems:

  1. The GUI installer will ask for a root password for the installation. No matter what pw you enter, you will be denied (italics for emphasis). This is true on my 64-bit Maverick and on the eeePC UNR 9.10. 
  2. Running the installer as sudo from the terminal will resolve problem 1, but the installation still fails on my UL30 64-bit system.
  3. Scanning is a whole 'nother issue
Here is how to install the driver on 64-bit debian-based systems, like Ubuntu. First, download the driver here.
Once you have downloaded it, open it and extract it somewhere, preferably home folder or a subfolder therein. Then grab a terminal and cd into the directory where you extracted the driver and enter the following:
Code:
./lexmark-inkjet-08-driver-1.0-1.i386.deb.sh --noexec --target lexmark
cd lexmark/
tar xvf instarchive_all --lzma
lexmark-inkjet-08-driver-1.0-1.i386.deb
sudo dpkg -i --force-all lexmark-inkjet-08-driver-1.0-1.i386.deb
Your driver will now be installed. You may follow the instructions listed above, namely replacing all 0x011d/011d with 0x010b/010b in /usr/lexinkjet/lxk08/. One notable change from the ubuntuforums directions above is that there is also an instance of 011D in the lx2600.ppd file.
You can double-check that you found all the instances by using a simple grep:
Code:
grep -r -i -H 011d /usr/lexinkjet/lxk08/
At this point, I am stuck not being able to print or scan. All print requests halt at "Printer is busy." Neither xsane or simplescan recognize that a scanner is present. So, to be continued...

Rahasia : Make URLs Tiny with TinyURL Gnome-Do Plugin

URLs are an unwieldy bunch, and much like my wife's vociferous tirades, they are only getting longer. However, there exist many great resources (here, here, and here; the list goes on) to shorten that distastefully lengthy URL for a quick paste into gchat, a facebook comment, or the like. To do this, you must undertake the arduous and lengthy task of opening a new broswer tab, pasting, clicking, copying, then pasting.
Ubuntu, for many, is about speed and productivity. And looks. And ease of use. One of the best ways to increase your productivity in the Gnome environment is Gnome-Do (reviewed previously). Do has a ton of great plugins, with descriptors on usage and modification on the wiki. A great plugin for Do is TinyURL, which is in the community plugins section. To turn it on, go to Gnome-Do preferences, search for TinyURL in the plugins tab, and make sure it is checked. Here is a great usage, making a link to a favorite cooking blog, for gluten free molasses cookies.\

1. Open the gnome-do window
2. paste your url in the first box,
3. hit tab
4. type in t,i,n. this should bring up the tinyurl option. hit enter
5. you now have your TinyURL generated. You may visit the site by hitting enter, or...
6. hit tab. type in copy, and hit enter. it is now copied to your clipboard!

This whole process takes about 1-2 seconds. And you never have to remove your hands from the keyboard. It is a super-quick way of producing shortened urls and have them in your clipboard. See pictures below for visual depictions of the above-mentioned instructions.


Rahasia : Hack into Wireless Routers With WepCrack-GUI

Aircrack-ng is suite of CLI applications centered around penetrating wireless routers. It is available in the repositories. To install in Ubuntu 10.10, simply type into a terminal:

sudo apt-get install aircrack-ng
There is lots of great information available on the aircrack website, and in the aircrack forums. I am sure you will dutifully read every word written in their wiki, but perhaps you still have questions and don't enjoy being mocked and derided by the german hackers who frequent their site (they tend to answer every question with, "please read before posting [dumbass]"). Maybe you are not at the level where you can thoroughly appreciate the intricacies of wireless security and WEP key decryption. I recommend at least reading the getting started guide, so that you know a little about what is going on. I won't attempt to write a how-to guide on individual commands, because that is way above my paygrade. However, let's say you want to gain access to a router, yet you have not been afforded the password or key. Let's also say that you checked with the law and bylaws of your area and are assured that it is not illegal in your area, as it is illegal in many areas to access a router to which you have not been given proper authorization by its owner. Again, let's say that you are sure you are not violating the laws in your area by using this software.

So here you are, you to want crack a router's security, but you are a total n00b. Well, fear not my friends, WepCrack-GUI is here! This is a nifty lil' GUI app written in mono, that will essentially perform the aircrack-ng CLI commands for you, and output it in its cute GUI interface.


To install WepCrack-GUI, direct your browser to their sourceforge page, or enter the following commands into a terminal:
Code:
wget http://sourceforge.net/projects/wepcrackgui/files/Rel_08_4/WepCrack0.8.4.tar.gz

tar xvfz WepCrack0.8.4.tar.gz
cd WepCrack/
sudo ./wepcrack

This will final command will run the GUI interface and *should* turn off your network-manager (so don't be alarmed if/when it does). Don't worry, it will switch your wireless back on once you close the applications. If it crashes, your network-manager will still be off. To restore your wireless, go ahead and reopen the program and then close in properly, or enter into a terminal

sudo start network-manager
Should you want to use crunch to crack WPA or mdk3 to discover hidden ESSID (hint: you want this), then you will need to grab and install those files as well.

Crunch:

Download latest crunch from here or open a terminal and enter:
Code:
wget http://sourceforge.net/projects/crunch-wordlist/files/crunch-wordlist/crunch-2.7.tgz

tar xvf crunch-2.7.tgz
cd crunch2.7/
make
make install

MDK3

Download latest MDK3 files from here. Then extract and open a terminal:

Code:
cd 
tar xvjf 
make
make install

Once you have downloaded and installed these two files, open WepCrackGUI and click on Options-->Preferences and make sure the crunch and mdk3 locations point to the respective install folders. I went ahead and moved the crunch and mdk3 folders to the wepcrack folder once they were installed.

Now you are ready to roll, sort of. You have to make sure your wireless card supports aircrack-ng in general, and packet injection in specific. You will have to do some careful reading on the aircrack-ng compatibility page to make this determination. It works perfectly on my Asus UL30A running Ubuntu 10.10, which has an Atheros AR9285 wireless chipset . To make it work, you MUST use patched compat-wireless drivers. To do this, follow the instructions here, under the subheading for kernel 2.6.24 or higher. You will need to go to the site and download the driver yourself, because they are not updated daily so the date -I flag will not work.

I used driver-select, because I am running ath9k drivers (check your lsmod output to see if you are). If you are also using ath9k drivers, then you can simply follow the driver select options on the compat-wireless page linked above, word for word. Make sure you reload your wireless driver with:
sudo modprobe ath9k
You can check your lsmod output to see if the driver is in fact patched. After that, you should have no problems switching channels or injecting packets with either the CLI or the GUI app.

Happy Cracking!